Digital Laser Cutting
What is Digital Laser Cutting?
Digital laser cutting is a process to cut paper and other thin, flat materials into shapes such as a circle, heart or star. Smartpress’ online printing services include a MotionCutter laser digital die-cutting system, which also allows for perforating, scoring, creasing and etching.
Though traditional laser cutting can be expensive for small quantities, laser die cutting allows for short-run die cutting at an affordable price. With this type of laser cutting, the laser traces the design quickly and easily, instead of creating a die for each project.
Smartpress can die cut Cards, Greeting Cards, Invitations, Business Cards and more. Visit Digital Laser Cutting for a full product list.
Laser Die-Cut Design
With laser die cutting, there are a variety of unique design options available.
Die Cut
- Die cutting is the process of cutting paper into various shapes.
- More intricate patterns can also be cut into a material such as a cutout honeycomb pattern or filigree.
- When you create a die-cut design that has a lot of detail, be sure to include enough connecting or holding points so it remains intact when the remnants are removed.
Perforation
- Very small holes are punched into the paper according to your design specifications.
- This allows a portion of the paper to be torn away easily where the holes are located, as with a coupon or an invitation with a tear-off RSVP.
Score/Crease
- Scoring is the process of creasing the paper so it folds easily.
- Score/crease lines are not recommended to be added over printed areas, as they will remove the ink.
Kiss Cut
- A kiss cut is a light surface cut that goes through one layer of a two-layered material such as Stickers.
Etch
- Once a design is printed onto the paper, the MotionCutter can remove just the top layer of ink, revealing the original white paper below.
Variable Finishing
- Like the variable data printing option, variable finishing die cuts names and other personalization into each design.
It’s important to note the laser may cause a slight discoloration on cut edges. This effect is minimal and will be more noticeable on white stocks or lightly printed areas with cutouts. It will likely not appear at all on most online printing projects.
Laser Die Cutting File Setup
To set up a successful print file with laser die cutting for an online printer, follow the steps below for Adobe InDesign and Adobe Illustrator. If you have any questions about setting up your file, please contact customer service.
Laser Cutting – Adobe Illustrator
Smartpress offers die cut printing on a variety of products. With our laser cutting equipment, we can die cut both simple and complex shapes quickly and easily at a low cost.
Set up your file for laser die cutting:
- In Adobe Illustrator, create a new layer on top that will contain the laser cut portions of your design. Name the layer Laser Cut. If your design includes die cut portions, name the layer Die Cut.
- Once this layer is in place, create a new color swatch by going to Window > Color > Swatches. The Swatch Palette will appear.
- Click in the upper right-hand corner of the Swatch Palette and select New Swatch.
- Change the Swatch Name to match the desired line type (e.g., Dieline. See the Line Type Glossary below for definitions).
- Select Spot in the Color Type drop-down menu.
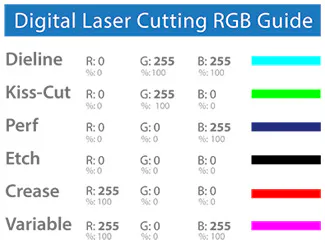
- Change the Color Mode to RGB and adjust the values to match the desired line type.
- Repeat steps 2-6 for any other types of lines in your file (dieline, kiss cut, perforation, etch, etc.).
- On the Laser Cut layer with the corresponding spot color, clearly define the shape outlines that will be cut out or etched with a .25 pt stroke weight. All lines, including perforation, should be solid not dashed.
- Be sure to leave at least 2mm between lines and create a design with enough connecting/holding points so it remains intact when the cut pieces are removed. You may include clipping masks in your printed artwork, but make sure the laser-cut lines do not include clipping masks.
- Once your artwork is complete, save it as a PDF. In the PDF saving options box under Output, there is a Profile Inclusion Policy drop-down. Select Don’t Include Profiles and then click Save PDF.
Your file is now ready for submission!
- Dieline – A line cut through the sheet (e.g., a shaped outside edge or a cutout inside the piece)
- Kiss Cut – A line cut through one layer of a two-layered sheet (e.g., the cut goes through the top layer of a sticker, leaving the backing intact)
- Perf (Perforation) – A line of tiny holes that allows for part of a sheet to be neatly torn off
- Etch – A line or outline of an area where the ink is removed from the surface, revealing the original sheet below
- Score/Crease – A line indicating where the sheet folds (Note: Not recommended over printed areas, as the line will remove ink)
- Variable – Text or numbers for personalizing (e.g., cutting out names for a direct mail piece)
Laser Cutting – Adobe InDesign
Smartpress offers laser cutting on a variety of print offerings. With our laser cutting equipment, we can die cut both simple and complex shapes quickly and easily at a low cost.
Set up your file for laser die cutting:
- In Adobe InDesign, create a new layer on top that will contain the laser cut portions of your design. Name the layer Laser Cut. If your design includes die cut portions, name the layer Die Cut.
- Once this layer is in place, create a new color swatch by going to Window > Color > Swatches. The Swatch Palette will appear.
- Click in the upper right-hand corner of the Swatch Palette and select New Color Swatch.
- Change the Swatch Name to match the desired line type (e.g., Dieline. See the Line Type Glossary below for definitions).
- Select Spot in the Color Type drop-down menu.
- Change the Color Mode to RGB and adjust the values to match the desired line type.
- Repeat steps 2-6 for any other types of lines in your file (dieline, kiss cut, perforation, etch, etc.).
- On the Laser Cut layer with the corresponding spot color, clearly define the shape outlines that will be cut out or etched with a .25 pt stroke weight. All lines, including perforation, should be solid not dashed.
- Be sure to leave at least 2mm between lines and create a design with enough connecting/holding points so it remains intact when the cut pieces are removed. You may include clipping masks in your printed artwork, but make sure the laser-cut lines do not include clipping masks.
- Once your artwork is complete, save it as a PDF. In the PDF saving options box under Output, there is a Profile Inclusion Policy drop-down. Select Don’t Include Profiles and then click Export.
Your file is now ready for submission!
- Dieline – A line cut through the sheet (e.g., a shaped outside edge or a cutout inside the piece)
- Kiss Cut – A line cut through one layer of a two-layered sheet (e.g., the cut goes through the top layer of a sticker, leaving the backing intact)
- Perf (Perforation) – A line of tiny holes that allows for part of a sheet to be neatly torn off
- Etch – A line or outline of an area where the ink is removed from the surface, revealing the original sheet below
- Score/Crease – A line indicating where the sheet folds (Note: Not recommended over printed areas, as the line will remove ink)
- Variable – Text or numbers for personalizing (e.g., cutting out names for a direct mail piece)
Learn more: The Power of Light: Digital Laser Cutting