How to Install Tension Fabric Displays
Perfect for trade shows, conferences, events and virtual meeting backdrops, Tension Fabric Displays create a professional look as they promote your brand and products. After you’ve placed your online printing order, follow these simple instructions for how to install tension fabric displays in any space:
Before You Begin
Before you begin to assemble your Tension Fabric Display, make sure you have all of the included product parts. Note: Because we offer multiple display sizes, the number of parts will vary based on the size you purchased.
- Top corner poles
- Top horizontal pole
- Vertical shock-corded poles
- Fabric graphic
- Horizontal middle pole
- Base

Tension Fabric Display Setup
Step 1
Remove all of the parts from the carry case and place them on a clean, flat surface.
Step 2
Assemble the vertical shock-corded poles by placing the tapered end of one pole into the large end of the next while pressing the snap button, as shown.

Step 3
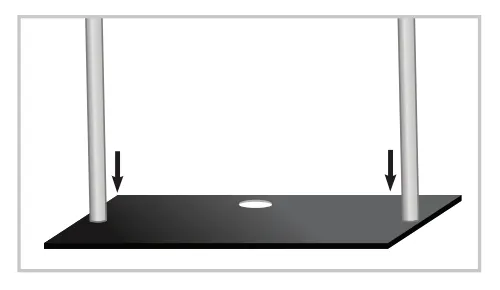
Attach the vertical shock-corded poles into the ports on the base, as shown.

Step 4
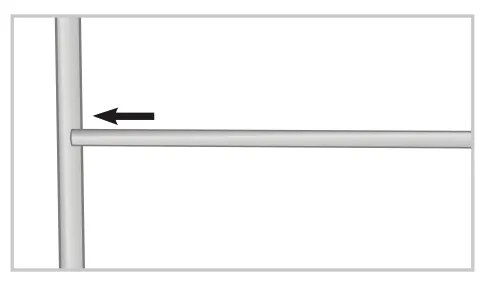
Insert the ends of the horizontal middle pole into both sides of the vertical shock-corded poles, as shown.

Step 5
Attach the top corner poles and top horizontal pole to the vertical poles, as shown.

Step 6
Slide fabric graphic over the top of the display, as shown.

Display Storage and Care
Place all product parts into the carry case and store in a cool dry location. Displays are recommended for indoor use only. Machine wash on gentle cycle using mild detergent. Tumble dry no heat. Do NOT dry clean. Do NOT iron.
As a premium online printer, we offer replacement graphics for displays of all sizes, too. You can find them here: Tension Fabric Display Replacements.
If you have any questions about how to install tension fabric displays or any of our online printing services, check out our Tension Fabric Displays FAQ or please contact customer service.

