Mailing Design Guidelines
Though many of the standards for each type of mailing piece are similar, there are mailing design guidelines and diagrams below for creating direct mail online. You’ll find direct mail postcards, envelopes, folded self-mailers and brochures, plus stapled pieces (like booklets).
Following the design guidelines below when creating your mailing pieces will ensure the USPS accepts them and enhance the likelihood they are delivered successfully to intended recipients.
Postcard Mailing Design Guidelines & Diagram
When creating postcards for online printing, follow these design guidelines to ensure that the postal service will accept, process and deliver them.
- Postcards must be at least 3-1/2” x 5”. To qualify for First Class rates, it can be no larger than 6” x 9”; for Standard rates, no larger than 6-1/8″ x 11-1/2″.
- Never put any wording, logos or other important art closer than 1/16” from the edge. It may get trimmed off during the printing process.
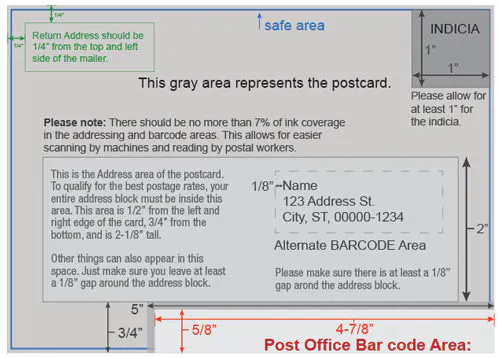
- Leave a 1” x 1” space in the upper right-hand corner of the front side design for the postcard’s postage or indicia.
- The address can be placed anywhere within a specific space on the postcard. This area is 1/2” from the left and right edge of the card, 3/4” from the bottom and is 2-1/8” tall.
- If a return address is included, it should be located 1/4” from the top left side of the postcard.
- There should be no more than 7% of ink coverage in the addressing and barcode areas. This allows for easier scanning by machines and reading by postal workers.
- The Intelligent Mail barcode is approximately 3” x 5/8” and can be included in the address block if there is at least 3-1/2” of horizontal space available in the address area.
- If the barcode is not included in the address block, it will be placed across the bottom of the postcard, toward the right side corner. Leave a space 3/4″ x 4-7/8” in the lower right-hand corner to allow for it. Keep important design elements outside this space, as it may be covered by the barcode.
- If you will be adding stamps and messaging after printing, we would suggest a one-sided UV coating as this keeps the art or graphics side intact, while allowing for stamps and personalizing on the non-UV coated side.
- If you will be using a prepaid, printed indicia and variable data printing for addressing and messaging, then we suggest a two-sided UV coating to fully protect your printed piece.
- Download PDF Postcard Template
Envelope Mailing Design Guidelines & Diagram
When creating envelopes for an online printer, follow these design guidelines so that the postal service can easily accept, process and deliver them.
- Smartpress envelopes come in standard sizes, with the smallest being the A1 3-5/8” x 5-1/8” envelope and the largest being the 9” x 12″ envelope. The dimensions of your design should correspond with the dimensions of the envelope you choose.
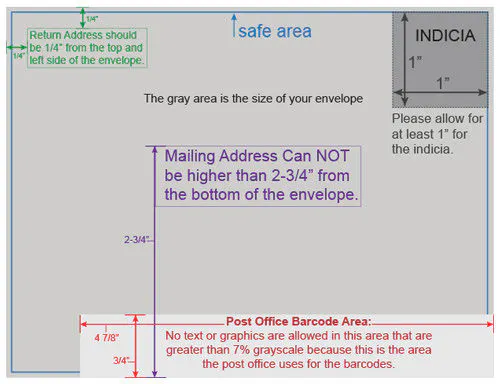
- Do not place any wording, logos or other art too close to the edge of the envelope. Leave at least 1/16” clearance around the edge of the envelope.
- The return address should be 1/4” from the top and left side of the envelope.
- Leave a 1” x 1” space in the upper right-hand corner of the front side design for the envelope’s postage or indicia.
- The top of the mailing address cannot be placed higher than 2-3/4” from the bottom of the envelope.
- There should be no more than 7% of ink coverage in the addressing and barcode areas. This allows for easier scanning by machines and reading by postal workers.
- The Intelligent Mail barcode is approximately 3” x 5/8” and can be included in the address block if there is at least 3-1/2” of horizontal space available in the address area.
- If the barcode is not included in the address block, it will be placed across the bottom of the envelope, toward the right side corner. Leave a space 3/4″ x 4-7/8” in the lower right-hand corner to allow for it. Keep important design elements outside this space, as it may be covered by the barcode.
- Download PDF Envelope Template
Self-Mailer With Folds – Brochures, Etc.
When designing brochures and other folded self-mailers with Smartpress’ online printing services, follow these design guidelines so that the postal service will be able to properly accept, process and deliver them.
- Self-mailers can vary in size but should be rectangular in shape and have a minimum height of 3-1/2” and a maximum of 6” when folded. The minimum length is 5” and the maximum is 10-1/2” when folded.
- Do not place any wording, logos or other art too close to the edge of the folded piece. Leave at least 1/16” clearance around the edge.
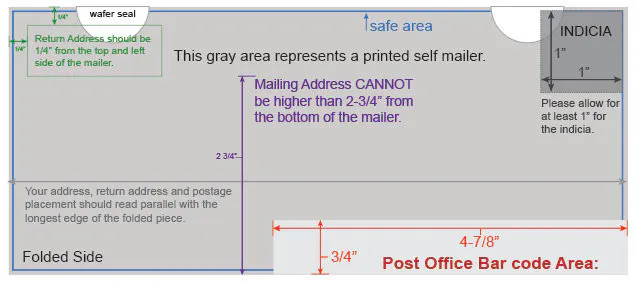
- Like envelopes and postcards, folded pieces will be processed by the length dimension by the postal service. This means that your address, return address and postage placement should read parallel with the longest edge of the brochure.
- The return address should be 1/4” from the top and left side of the mailer.
- The top of the mailing address cannot be placed higher than 2-3/4” from the bottom of the mailer.
- Leave a 1” x 1” space in the upper right-hand corner of the front side design for the mailing’s postage or indicia.
- There should be no more than 7% of ink coverage in the addressing and barcode areas. This allows for easier scanning by machines and reading by postal workers.
- Folded and/or stitched mailers require wafer seals to hold the piece closed during postal processing, whether they have a half-fold, tri-fold or another folding style. Wafer seals are typically placed at the short ends of the mailer (see diagram below).
- Choose two tabs for folded self-mailers. A folded self-mailer is formed when one or more unbound sheets of paper are folded together and sealed to make a letter-sized mail piece.
- Choose three tabs for booklet self-mailers. A booklet self-mailer is formed when sheets are fastened with at least two staples in the manufacturing fold (saddle stitched) or any other binding process that creates a ‘spine’ where pages are attached together.
- Booklet Types:
- Simple Spine – Spine forms the bottom edge of the mail piece
- Oblong – A spine on the leading (shorter) edge
- Folded – Bound and then folded to a letter size
- Wallet – A spine forms the bottom edge.
- Booklet Types:
- Wafer seals are semi-translucent but not transparent. Any text, logos or art that they overlap may be obscured. Take their location into account when considering placement of design elements.
- The Intelligent Mail barcode is approximately 3” x 5/8” and can be included in the address block if there is at least 3-1/2” of horizontal space available in the address area.
- If the barcode is not included in the address block, it will be placed across the bottom of the brochure or self-mailer, toward the right side corner. Leave a space 3/4″ x 4-7/8” long in the lower right-hand corner to allow for it. Keep important design elements outside this space, as it may be covered by the barcode.
- Download PDF Self Mailer Template
Booklet Mailing Design Guidelines
When printing booklets and other stapled mail pieces, follow these design guidelines so that the postal service will be able to properly accept, process and deliver them to recipients.
- Booklets mailing at letter-sized postage rates may vary in size but they must be rectangular with a L x H ratio between 1.3 and 2.5. The minimum size is 3-1/2″ x 5″ and the maximum size is 6″ x 10-1/2″. Booklets mailing at letter rates must be wafered sealed prior to mailing. Square booklets smaller than 6″ x 6″ are subject to additional non-automated postage fees.
- Booklets larger than 6″ x 10-1/2″ are subject to Flat Sized postage rates. The maximum size Smartpress offers is 12″ x 12″. Square booklets larger than 6″ x 6″ mail at Flat rates and are not subject to additional fees.
- Do not place any wording, logos or other art too close to the edge of the folded piece. Leave at least 1/16” clearance around the edge.
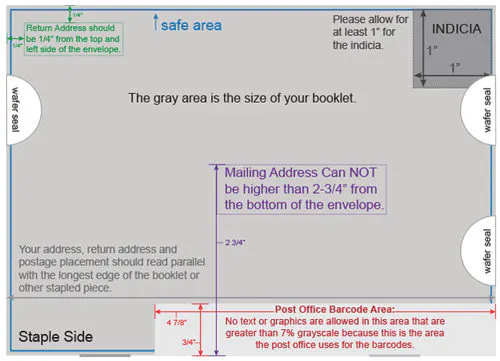
- Like envelopes, postcards and folded pieces, booklet mailers will be processed by length by the postal service. This means that your address, return address and postage placement should read parallel with the longest edge of the booklet (see diagram below).
- The return address should be 1/4” from the top and left side of the mailer.
- The top of the mailing address cannot be placed higher than 2-3/4” from the bottom of the mailer.
- Leave a 1” x 1” space in the upper right-hand corner of the front side design for the mailing’s postage or indicia.
- There should be no more than 7% of ink coverage in the addressing and barcode areas. This allows for easier scanning by machines and reading by postal workers.
- Booklets typically require wafer seals to hold the piece closed during postal processing. Wafer seals are typically placed at the short ends of the mailer (see diagram below).
- Wafer seals are semi-translucent but not transparent. Any text, logos or art that they overlap may be obscured. Take their location into account when considering placement of design elements.
- The Intelligent Mail barcode is approximately 3” x 5/8” and can be included in the address block if there is at least 3-1/2” of horizontal space available in the address area.
- If the barcode is not included in the address block, it will be placed across the bottom of the piece, toward the right side corner. Leave a space 3/4″ x 4-7/8” long in the lower right-hand corner to allow for it. Keep important design elements outside this space, as it may be covered by the barcode.
- Download PDF Booklet Template
If you have questions about mailing design guidelines or anything else about direct mail, please contact customer service and chat with our experts.